How to Build a Stock Trading Bot with Python
In this tutorial we will be building a stock trading bot in Python with Alpaca and Codesphere.
In this tutorial, we’re going to be using Python to build our own trading bot.
Keep in mind that this tutorial is not about how to make billions off of your trading bot. If I had an algorithm that sophisticated I probably wouldn’t be giving it away. Rather, I’m going to show you how you can read market data, buy and sell stocks, and program the logic of your trading algorithm, all with some relatively simple Python code.
And of course:
This article is for information purposes only. It is not intended to be investment advice. Seek a duly licensed professional for investment advice.
You can get your own full version by creating a Codesphere workspace from the trading bot template.
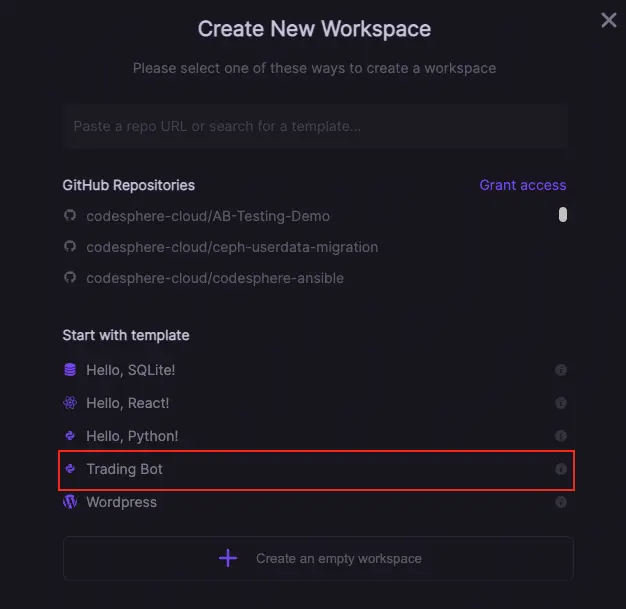
However, you will need an API key before you can actually start trading with our bot — More on that later.
Some Helpful Terms
Before we get started, it’ll be helpful to define a couple of terms:
- Paper Trading: The trading of securities with fake money for educational or testing purposes.
- Backtesting: Testing a trading algorithm against past market data in order to evaluate its effectiveness.
- Moving Average: The average of a certain amount of recent entries in a set of data.
- S&P 500: A stock market index composed of the 500 largest companies listed on US stock exchanges
- Closing Price: The final price of a security during a unit of time
- Good ’Til Cancel (GTC): When you place a trade, it may not be met right away. A broker will continue to try and execute a GTC trade until you cancel it.
Setup
The trading API we’re going to be using is called Alpaca and is by far one of the most intuitive trading APIs I’ve found.
In its free tier, Alpaca includes both Paper and Real Trading and both Historical and Live market data. It also has an incredibly clean user interface and Python library.
In addition, unless you’re willing to leave your python script running on your computer, you’re going to need to deploy your trading bot in the cloud. For this, we’re going to use Codesphere:

Since Codesphere’s front-end is an IDE, we can develop our bot directly on the platform. If you wish to do the coding on your local machine, however, you can connect your GitHub repo to Codesphere and deploy afterward.
The only environment setup we really need before we can start coding is to create our pip environment:
pipenv shellAnd then install the Alpaca API:
pipenv install alpaca_trade_apiWe are also going to need to make a free Alpaca account and then navigate to our Paper Trading Account.
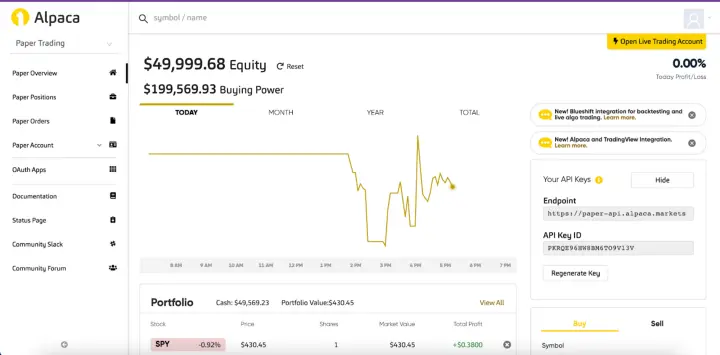
Notice your API Key on the right-hand side. When you first open your account, you will be prompted to generate a key and both public and private keys will be shown to you. We’re going to need those for later.
Buying and Selling Stocks
We can then set up our Alpaca Trading library and buy and sell stocks in Python like so:
import alpaca_trade_api as tradeapi

SEC_KEY = '' # Enter Your Secret Key Here
PUB_KEY = '' # Enter Your Public Key Here
BASE_URL = 'https://paper-api.alpaca.markets' # This is the base URL for paper trading
api = tradeapi.REST(key_id= PUB_KEY, secret_key=SEC_KEY, base_url=BASE_URL) # For real trading, don't enter a base_url


# Buy a stock
api.submit_order(
  symbol='SPY'; # Replace with the ticker of the stock you want to buy
  qty=1,
  side='buy',
  type='market',
  time_in_force='gtc' # Good 'til cancelled
)

# Sell a stock(Just change side to 'sell')
api.submit_order(
  symbol='SPY',
  qty=1,
  side='sell',
  type='market',
  time_in_force='gtc'
)
Our Strategy
The strategy we’re going to use is to buy and sell whenever the 5 minute moving average crosses our price. Now, this is FAR from a good trading strategy, but the logic is relatively simple and will allow us to focus on the general structure of a trading bot.
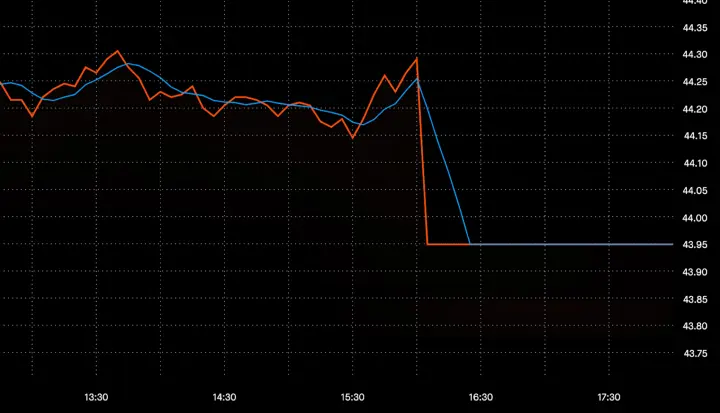
In the above example, the red line is the stock price and the blue line is the moving average. When the moving average crosses under our price, we are going to buy a share of our stock. We are then going to hold the stock until the moving average crosses again and goes above the price. When that happens we are going to sell our share, and then wait for the next buying signal.
In this article, we’ll be trading SPY, which is an index that tracks the S&P 500, and we will only be trading one stock at a time.
Keep in mind that if you were to make these trades with real money, you would have to comply with day trading regulations and brokerage fees, which would likely offset your gains.
Reading Market Data
Now let’s go over how to read market data using the Alpaca API in Python:
import alpaca_trade_api as tradeapi

import alpaca_trade_api as tradeapi
import numpy as np
import time

SEC_KEY = ''
PUB_KEY = ''
BASE_URL = 'https://paper-api.alpaca.markets'
api = tradeapi.REST(key_id= PUB_KEY, secret_key=SEC_KEY, base_url=BASE_URL)

symb = "SPY"

while True:
    print("")
    print("Checking Price")

    market_data = api.get_barset(symb, 'minute', limit=5) # Get one bar object for each of the past 5 minutes

    close_list = [] # This array will store all the closing prices from the last 5 minutes
    for bar in market_data[symb]:
        close_list.append(bar.c) # bar.c is the closing price of that bar's time interval

    close_list = np.array(close_list, dtype=np.float64) # Convert to numpy array
    ma = np.mean(close_list)
    last_price = close_list[4] # Most recent closing price

    print("Moving Average: " + str(ma))
    print("Last Price: " + str(last_price))

    time.sleep(60) # Wait one minute before retreiving more market data
If you’re looking for more in-depth information for when you build your strategy, check out Alpaca’s documentation:

Executing Our Strategy
Now let’s finally put all of this together for our complete trading algorithm:
import alpaca_trade_api as tradeapi
import numpy as np
import time


SEC_KEY = '' # Enter Your Secret Key Here
PUB_KEY = '' # Enter Your Public Key Here
BASE_URL = 'https://paper-api.alpaca.markets' # This is the base URL for paper trading
api = tradeapi.REST(key_id= PUB_KEY, secret_key=SEC_KEY, base_url=BASE_URL) # For real trading, don't enter a base_url


symb = "SPY"
pos_held = False

while True:
    print("")
    print("Checking Price")

    market_data = api.get_barset(symb, 'minute', limit=5) # Get one bar object for each of the past 5 minutes

    close_list = [] # This array will store all the closing prices from the last 5 minutes
    for bar in market_data[symb]:
        close_list.append(bar.c) # bar.c is the closing price of that bar's time interval

    close_list = np.array(close_list, dtype=np.float64) # Convert to numpy array
    ma = np.mean(close_list)
    last_price = close_list[4] # Most recent closing price

    print("Moving Average: " + str(ma))
    print("Last Price: " + str(last_price))


    if ma + 0.1 < last_price and not pos_held: # If MA is more than 10cents under price, and we haven't already bought
        print("Buy")
        api.submit_order(
            symbol=symb,
            qty=1,
            side='buy',
            type='market',
            time_in_force='gtc'
        )
        pos_held = True
    elif ma - 0.1 > last_price and pos_held: # If MA is more than 10cents above price, and we already bought
        print("Sell")
        api.submit_order(
            symbol=symb,
            qty=1,
            side='sell',
            type='market',
            time_in_force='gtc'
        )
        pos_held = False

    time.sleep(60)
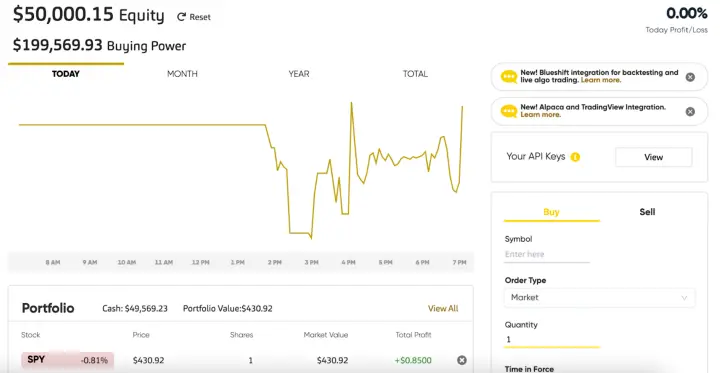
And there we have it! We just built a trading bot in 54 lines of code! Now if we leave this running on Codesphere throughout the day, we should see our Alpaca dashboard update throughout the day:
Backtesting a Strategy
Now if you don’t want to wait around to see if your algorithm is any good, we can use Alpaca’s market data API to backtest our Python algorithm against historical data:
import alpaca_trade_api as tradeapi
import numpy as np
import time

SEC_KEY = ''
PUB_KEY = ''
BASE_URL = 'https://paper-api.alpaca.markets'
api = tradeapi.REST(key_id= PUB_KEY, secret_key=SEC_KEY, base_url=BASE_URL)

symb = "SPY"
pos_held = False
hours_to_test = 2

print("Checking Price")
market_data = api.get_barset(symb, 'minute', limit=(60 * hours_to_test)) # Pull market data from the past 60x minutes

close_list = []
for bar in market_data[symb]:
    close_list.append(bar.c)


print("Open: " + str(close_list[0]))
print("Close: " + str(close_list[60 * hours_to_test - 1]))


close_list = np.array(close_list, dtype=np.float64)
startBal = 2000 # Start out with 2000 dollars
balance = startBal
buys = 0
sells = 0


for i in range(4, 60 * hours_to_test): # Start four minutes in, so that MA can be calculated
    ma = np.mean(close_list[i-4:i+1])
    last_price = close_list[i]

    print("Moving Average: " + str(ma))
    print("Last Price: " + str(last_price))

    if ma + 0.1 < last_price and not pos_held:
        print("Buy")
        balance -= last_price
        pos_held = True
        buys += 1
    elif ma - 0.1 > last_price and pos_held:
        print("Sell")
        balance += last_price
        pos_held = False
        sells += 1
    print(balance)
    time.sleep(0.01)

print("")
print("Buys: " + str(buys))
print("Sells: " + str(sells))

if buys > sells:
    balance += close_list[60 * hours_to_test - 1] # Add back your equity to your balance


print("Final Balance: " + str(balance))

print("Profit if held: " + str(close_list[60 * hours_to_test - 1] - close_list[0]))
print("Profit from algorithm: " + str(balance - startBal))
Next Steps
So there you have it, we just created a rudimentary trading bot with some fairly simple Python!
Here is the full repo:
While I highly encourage you guys to play around with the Alpaca API for educational purposes, be extremely careful if you are going to trade real securities. One bug in your code could have disastrous effects on your bank account.
On a lighter note, this is a great opportunity to put those statistics classes you took to work.


