Full Metal
Buying a used server on ebay kleinanzeigen and preparing it to be cloudified? Follow along to see what it takes to get a piece of metal running.

We are always thriving to provide customers the best possible experience. That includes anything related how Codesphere itself works and what you are directly experiencing, but also things that may not be as obvious, like compute power that make for more performance as well as headroom for demand spikes, so we can achieve the highest uptime goals.
One of the steps we will be taking on in the future is to add a new region to Codesphere, that will be entirely bare metal. In this region we will also be able to offer more GPU capacity. Please do reach out to our sales team if that is of interest for you.
Planning
Apparently, the idea of running things on hardware differs a bit from the reality. Our idea was "we will just oder some servers and everyone will be happy". That's kinda not how this works and we found out.
If you would like to run any workloads on bare metal servers there are quiet some considerations to make, however for us one of the most interesting questions is "how do we automate as much as possible". We are running a tight ship here, and so we don't really have the capacity to drop everything every second time to drive to the datacenter. We also wanted to automate provisioning of servers, and because that's not enough, we would also like to automate Kubernetes installation and of course version upgrade as well as the installation of Codesphere. Doesn't sound too hard, does it?
One thing to keep in mind is, that hardware is commonly coming with a hefty price tag, which means that you don't really
want that be lying around doing nothing, but rather put it to good use. This is and issue for the automation because we couldn't start developing that until we had a test setup, and you can't just put a server on your desk and get started.
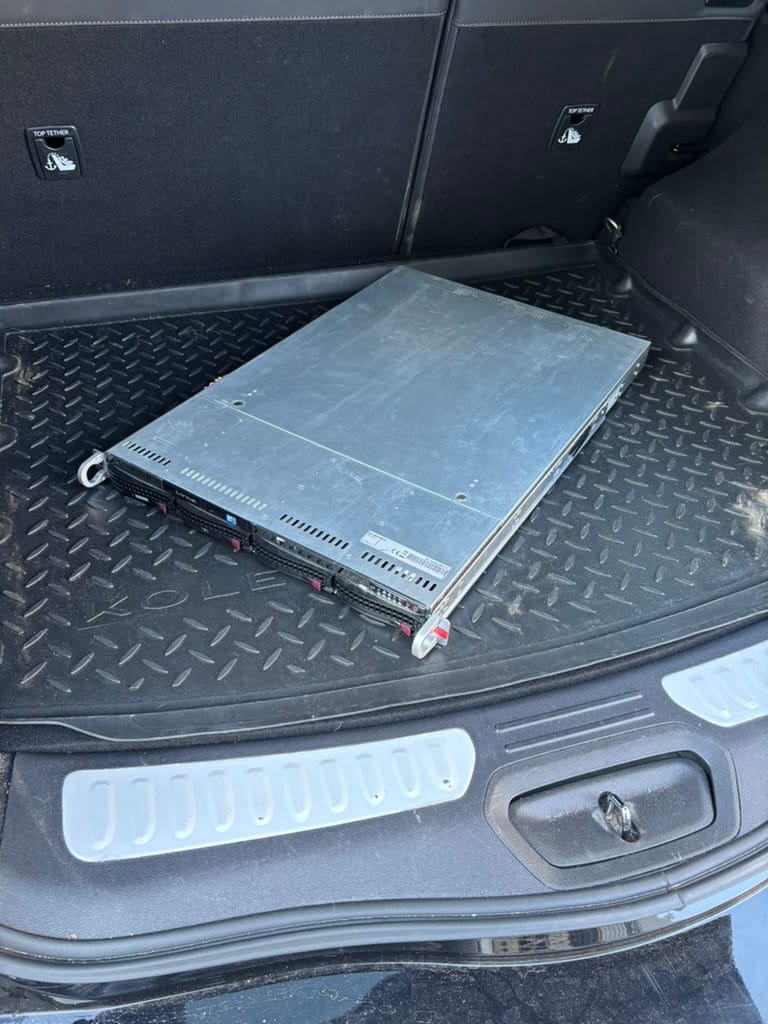
Turns out, you can. You just go, find a used server on Kleinanzeigen, drive 50km to pick it, bring it back, and you got a lab.

Now we just take it to its new home on our desk and get started, but the question is how can we get what we want? The answer is a project that I haven't looked at in a while: matchbox. Basically, it lets you PXE-boot machines with specific ignition configs. So that should allow us to boot our servers and have them set up as kubernetes nodes for our cluster. We can technically have matchbox public, since we'll use client cert to perform authentication.
Setting up
To set up we will need some bits and pieces. Firstly, we need to actually physically connect everything with cables. Then we will need to get matchbox ready. Going forward we will also need a database where we store some info about our servers, so we don't have to keep MACs in a notepad somewhere. We also need a dhcp server and a dns server.
In this section we will go over everything piece by piece, with notes what's production ready and what's not.
Physical Setup
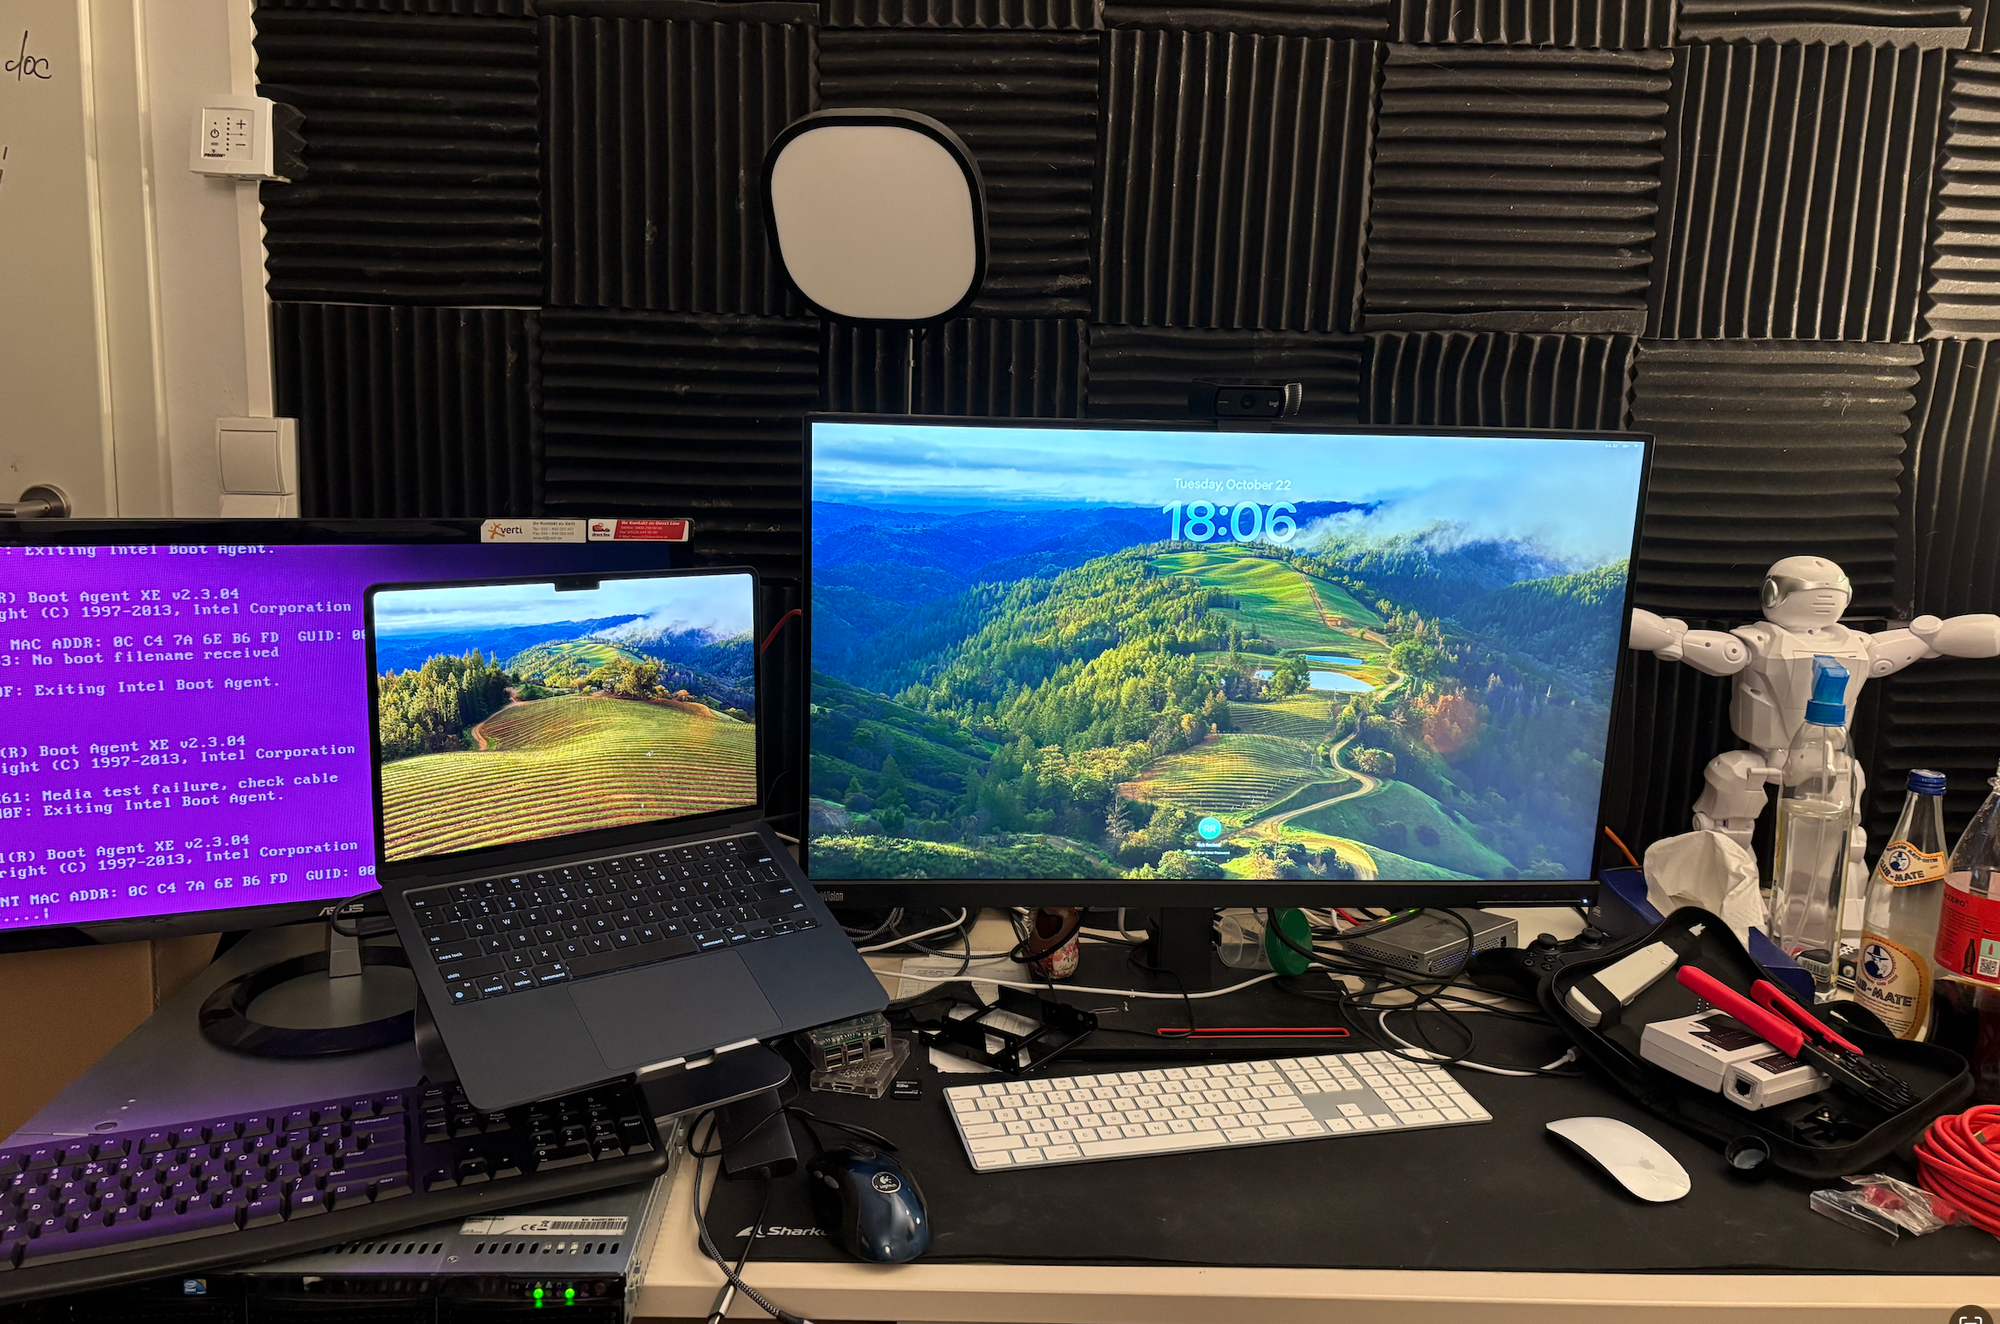
As mentioned we had to make a little desk lab until the rack rails arrive that I ordered now, but that shouldn't be a too much of an issue. We're setting up here a little simpler than what we're going to run in production, obviously.
I am running a Unifi Dream Machine Pro here manage all things networking and then a small 8-port switch on my desk.
We're connecting the IPMI port and one of the NIC ports to the 8-port switch, with two cat-6 cables. Luckily, I had equipment for crimping cables here, so it wasn't a big deal to just "make" those cables.
The whole setup is a little messy, but it'll do for now.

One caveat here is that the only monitor I had lying around is apparently broken. So the coloring is not something that I particularly liked, but the only color that monitor is capable of. Not great, not awful, but gets the job done.
Network
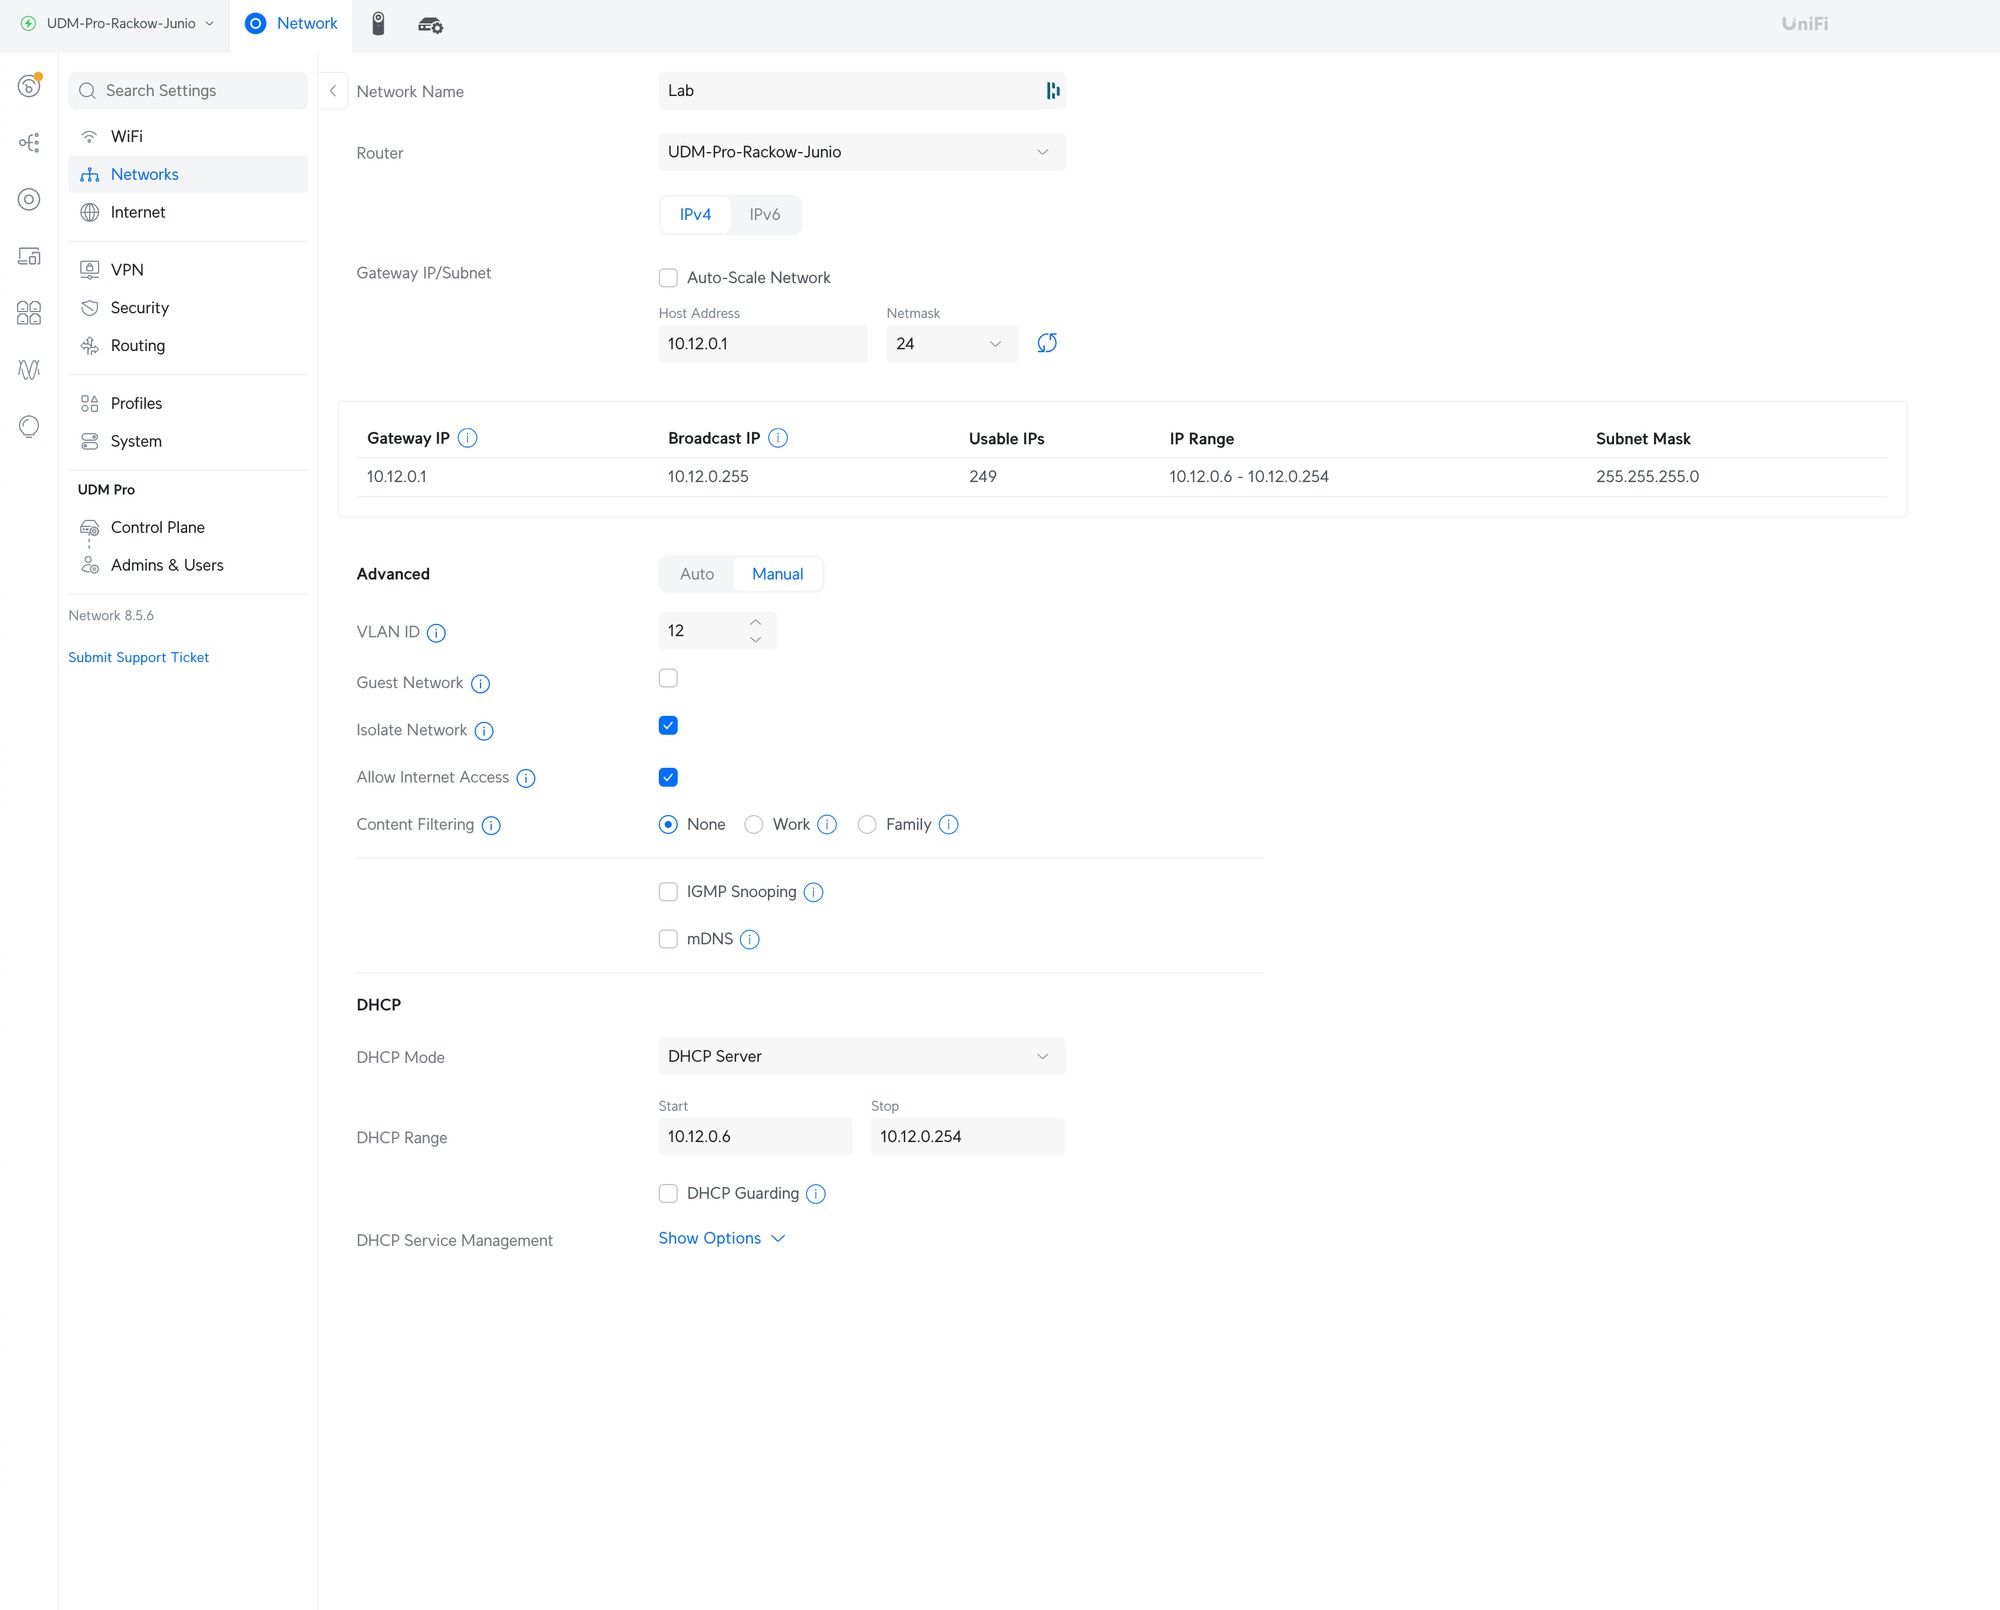
As mentioned I'm using a Unifi Dream Machine Pro and the 8-port switch. I created a new network called "lab" for this purpose and set it to be isolated. I do appreciate that Unifi gives you that option out of the box so you don't have to fiddle around with the firewall rules but can just get it done.
While it might be a little overkill, the network is a /24 and with DHCP enabled. That might still bite us later but is going to hopefully get us going a little easier at the start.

I assigned the network to the ports that I'm using on the desk switch to plug in the NICs. Then I have one additiona port also on that network to plug in a raspberry pi that I'll use to host matchbox. Obviously, we will not be using a single raspberry pi to rely on in production, but I didn't really see a need to set up a new VPC with a cloud provider and then VPN connect to on site.
Last but not least, I have another network called "ipmi-lab", which is also assigned to a port on the switch. This is where the IPMI port is connected to.
Deploying Matchbox
Since Matchbox isn't doing anything secret, as mentioned, I could just go ahead and actually deploy it to codesphere, however the issue is, that we'd later bring ourselves in a little bit of a cyclic dependency if we rely on codesphere to bootstrap codesphere. Maybe we'll come up with something better later, but for now we'll run it on a raspberry pi.
The Pi is a standard RPI 3B running Raspberry Pi OS. Since this distro is debian based, things should go smoothly when installing docker.
To install I just run the convenience script:
$ curl -fsSL https://get.docker.com -o get-docker.sh
$ sudo sh ./get-docker.sh
# Executing docker install script, commit: 6d51e2cd8c04b38e1c2237820245f4fc262aca6c
+ sh -c apt-get -qq update >/dev/null
+ sh -c DEBIAN_FRONTEND=noninteractive apt-get -y -qq install ca-certificates curl >/dev/null
+ sh -c install -m 0755 -d /etc/apt/keyrings
+ sh -c curl -fsSL "https://download.docker.com/linux/debian/gpg" -o /etc/apt/keyrings/docker.asc
+ sh -c chmod a+r /etc/apt/keyrings/docker.asc
+ sh -c echo "deb [arch=arm64 signed-by=/etc/apt/keyrings/docker.asc] https://download.docker.com/linux/debian bookworm stable" > /etc/apt/sources.list.d/docker.list
+ sh -c apt-get -qq update >/dev/null
+ sh -c DEBIAN_FRONTEND=noninteractive apt-get -y -qq install docker-ce docker-ce-cli containerd.io docker-compose-plugin docker-ce-rootless-extras docker-buildx-plugin >/dev/null
+ sh -c docker version
Client: Docker Engine - Community
 Version:           27.3.1
 API version:       1.47
 Go version:        go1.22.7
 Git commit:        ce12230
 Built:             Fri Sep 20 11:41:19 2024
 OS/Arch:           linux/arm64
 Context:           default

Server: Docker Engine - Community
 Engine:
  Version:          27.3.1
  API version:      1.47 (minimum version 1.24)
  Go version:       go1.22.7
  Git commit:       41ca978
  Built:            Fri Sep 20 11:41:19 2024
  OS/Arch:          linux/arm64
  Experimental:     false
 containerd:
  Version:          1.7.22
  GitCommit:        7f7fdf5fed64eb6a7caf99b3e12efcf9d60e311c
 runc:
  Version:          1.1.14
  GitCommit:        v1.1.14-0-g2c9f560
 docker-init:
  Version:          0.19.0
  GitCommit:        de40ad0

================================================================================

To run Docker as a non-privileged user, consider setting up the
Docker daemon in rootless mode for your user:

    dockerd-rootless-setuptool.sh install

Visit https://docs.docker.com/go/rootless/ to learn about rootless mode.


To run the Docker daemon as a fully privileged service, but granting non-root
users access, refer to https://docs.docker.com/go/daemon-access/

WARNING: Access to the remote API on a privileged Docker daemon is equivalent
         to root access on the host. Refer to the 'Docker daemon attack surface'
         documentation for details: https://docs.docker.com/go/attack-surface/

================================================================================
Next we also want to be able to run docker commands as non-privileged user. Conveniently the instructions are given to us right away from the installation command, so we just go ahead and run it:
$ dockerd-rootless-setuptool.sh install
[ERROR] Missing system requirements. Run the following commands to
[ERROR] install the requirements and run this tool again.

########## BEGIN ##########
sudo sh -eux <<EOF
# Install newuidmap & newgidmap binaries
apt-get install -y uidmap
EOF
########## END ##########
So we do that too:
$ sudo sh -eux <<EOF
# Install newuidmap & newgidmap binaries
apt-get install -y uidmap
EOF
+ apt-get install -y uidmap
Reading package lists... Done
Building dependency tree... Done
Reading state information... Done
The following additional packages will be installed:
  libsubid4
The following NEW packages will be installed:
  libsubid4 uidmap
0 upgraded, 2 newly installed, 0 to remove and 18 not upgraded.
Need to get 395 kB of archives.
After this operation, 779 kB of additional disk space will be used.
Get:1 http://deb.debian.org/debian bookworm/main arm64 libsubid4 arm64 1:4.13+dfsg1-1+b1 [208 kB]
Get:2 http://deb.debian.org/debian bookworm/main arm64 uidmap arm64 1:4.13+dfsg1-1+b1 [188 kB]
Fetched 395 kB in 0s (1,748 kB/s)
Selecting previously unselected package libsubid4:arm64.
(Reading database ... 130768 files and directories currently installed.)
Preparing to unpack .../libsubid4_1%3a4.13+dfsg1-1+b1_arm64.deb ...
Unpacking libsubid4:arm64 (1:4.13+dfsg1-1+b1) ...
Selecting previously unselected package uidmap.
Preparing to unpack .../uidmap_1%3a4.13+dfsg1-1+b1_arm64.deb ...
Unpacking uidmap (1:4.13+dfsg1-1+b1) ...
Setting up libsubid4:arm64 (1:4.13+dfsg1-1+b1) ...
Setting up uidmap (1:4.13+dfsg1-1+b1) ...
Processing triggers for man-db (2.11.2-2) ...
Processing triggers for libc-bin (2.36-9+rpt2+deb12u8) ...
Now we try the rootless setup script again:
$ dockerd-rootless-setuptool.sh install
[INFO] Creating /home/rrackow/.config/systemd/user/docker.service
[INFO] starting systemd service docker.service
+ systemctl --user start docker.service
+ sleep 3
+ systemctl --user --no-pager --full status docker.service
● docker.service - Docker Application Container Engine (Rootless)
     Loaded: loaded (/home/rrackow/.config/systemd/user/docker.service; disabled; preset: enabled)
     Active: active (running) since Wed 2024-10-23 07:52:22 BST; 3s ago
       Docs: https://docs.docker.com/go/rootless/
   Main PID: 21760 (rootlesskit)
      Tasks: 38
     Memory: 60.4M
        CPU: 2.051s
     CGroup: /user.slice/user-1000.slice/user@1000.service/app.slice/docker.service
             ├─21760 rootlesskit --state-dir=/run/user/1000/dockerd-rootless --net=slirp4netns --mtu=65520 --slirp4netns-sandbox=auto --slirp4netns-seccomp=auto --disable-host-loopback --port-driver=builtin --copy-up=/etc --copy-up=/run --propagation=rslave /usr/bin/dockerd-rootless.sh
             ├─21771 /proc/self/exe --state-dir=/run/user/1000/dockerd-rootless --net=slirp4netns --mtu=65520 --slirp4netns-sandbox=auto --slirp4netns-seccomp=auto --disable-host-loopback --port-driver=builtin --copy-up=/etc --copy-up=/run --propagation=rslave /usr/bin/dockerd-rootless.sh
             ├─21795 slirp4netns --mtu 65520 -r 3 --disable-host-loopback --enable-sandbox --enable-seccomp 21771 tap0
             ├─21802 dockerd
             └─21825 containerd --config /run/user/1000/docker/containerd/containerd.toml

Oct 23 07:52:22 raspberrypi dockerd-rootless.sh[21802]: time="2024-10-23T07:52:22.612080722+01:00" level=warning msg="WARNING: No io.weight support"
Oct 23 07:52:22 raspberrypi dockerd-rootless.sh[21802]: time="2024-10-23T07:52:22.612155200+01:00" level=warning msg="WARNING: No io.weight (per device) support"
Oct 23 07:52:22 raspberrypi dockerd-rootless.sh[21802]: time="2024-10-23T07:52:22.612219731+01:00" level=warning msg="WARNING: No io.max (rbps) support"
Oct 23 07:52:22 raspberrypi dockerd-rootless.sh[21802]: time="2024-10-23T07:52:22.612393376+01:00" level=warning msg="WARNING: No io.max (wbps) support"
Oct 23 07:52:22 raspberrypi dockerd-rootless.sh[21802]: time="2024-10-23T07:52:22.612458219+01:00" level=warning msg="WARNING: No io.max (riops) support"
Oct 23 07:52:22 raspberrypi dockerd-rootless.sh[21802]: time="2024-10-23T07:52:22.612515614+01:00" level=warning msg="WARNING: No io.max (wiops) support"
Oct 23 07:52:22 raspberrypi dockerd-rootless.sh[21802]: time="2024-10-23T07:52:22.612668895+01:00" level=info msg="Docker daemon" commit=41ca978 containerd-snapshotter=false storage-driver=overlay2 version=27.3.1
Oct 23 07:52:22 raspberrypi dockerd-rootless.sh[21802]: time="2024-10-23T07:52:22.613521753+01:00" level=info msg="Daemon has completed initialization"
Oct 23 07:52:22 raspberrypi dockerd-rootless.sh[21802]: time="2024-10-23T07:52:22.907914104+01:00" level=info msg="API listen on /run/user/1000/docker.sock"
Oct 23 07:52:22 raspberrypi systemd[796]: Started docker.service - Docker Application Container Engine (Rootless).
+ DOCKER_HOST=unix:///run/user/1000/docker.sock /usr/bin/docker version
Client: Docker Engine - Community
 Version:           27.3.1
 API version:       1.47
 Go version:        go1.22.7
 Git commit:        ce12230
 Built:             Fri Sep 20 11:41:19 2024
 OS/Arch:           linux/arm64
 Context:           default
                                                                                                                                                                                                                                                                                                                                                                                                                           08:58:44 [9/1855]
Server: Docker Engine - Community
 Engine:
  Version:          27.3.1
  API version:      1.47 (minimum version 1.24)
  Go version:       go1.22.7
  Git commit:       41ca978
  Built:            Fri Sep 20 11:41:19 2024
  OS/Arch:          linux/arm64
  Experimental:     false
 containerd:
  Version:          1.7.22
  GitCommit:        7f7fdf5fed64eb6a7caf99b3e12efcf9d60e311c
 runc:
  Version:          1.1.14
  GitCommit:        v1.1.14-0-g2c9f560
 docker-init:
  Version:          0.19.0
  GitCommit:        de40ad0
 rootlesskit:
  Version:          2.3.1
  ApiVersion:       1.1.1
  NetworkDriver:    slirp4netns
  PortDriver:       builtin
  StateDir:         /run/user/1000/dockerd-rootless
 slirp4netns:
  Version:          1.2.0
  GitCommit:        656041d45cfca7a4176f6b7eed9e4fe6c11e8383
+ systemctl --user enable docker.service
Created symlink /home/rrackow/.config/systemd/user/default.target.wants/docker.service → /home/rrackow/.config/systemd/user/docker.service.
[INFO] Installed docker.service successfully.
[INFO] To control docker.service, run: `systemctl --user (start|stop|restart) docker.service`
[INFO] To run docker.service on system startup, run: `sudo loginctl enable-linger rrackow`

[INFO] Creating CLI context "rootless"
Successfully created context "rootless"
[INFO] Using CLI context "rootless"
Current context is now "rootless"

[INFO] Make sure the following environment variable(s) are set (or add them to ~/.bashrc):
export PATH=/usr/bin:$PATH

[INFO] Some applications may require the following environment variable too:
export DOCKER_HOST=unix:///run/user/1000/docker.sock
Now that we're going with docker, we can try to run Matchbox. In the
documentation v0.10.0 is referenced, but we can go ahead and look up the latest tags in quay, and then use that.
That brings us to the following command to create the assets directory that we can then mount into the container:
mkdir -p /var/lib/matchbox/assets
Now we can run the container:
docker run --net=host --rm -v /var/lib/matchbox:/var/lib/matchbox:Z -v /etc/matchbox:/etc/matchbox:Z,ro quay.io/poseidon/matchbox:v0.11.0-87-g4622144b-arm64 -address=0.0.0.0:8080 -rpc-address=0.0.0.0:8081 -log-level=debug
Unable to find image 'quay.io/poseidon/matchbox:v0.11.0-87-g4622144b-arm64' locally
v0.11.0-87-g4622144b-arm64: Pulling from poseidon/matchbox
aed6481c86ad: Pull complete
f2a13e5e4e6d: Pull complete
Digest: sha256:a82eabed36f2e176eab0c21ecc14d9389e73084ab9a7c09d108620200b9b5f52
Status: Downloaded newer image for quay.io/poseidon/matchbox:v0.11.0-87-g4622144b-arm64
time="2024-10-23T06:58:54Z" level=fatal msg="Provide a valid TLS server certificate with -cert-file: stat /etc/matchbox/server.crt: no such file or directory"
Turns out we skipped a step that's not in the "docker" section of the matchbox documentation: we actually need to generate certificates. To do so, we'll clone the matchbox repo:
$ git clone https://github.com/poseidon/matchbox.git
Cloning into 'matchbox'...
remote: Enumerating objects: 17746, done.
remote: Counting objects: 100% (947/947), done.
remote: Compressing objects: 100% (596/596), done.
remote: Total 17746 (delta 696), reused 525 (delta 330), pack-reused 16799 (from 1)
Receiving objects: 100% (17746/17746), 19.31 MiB | 1.81 MiB/s, done.
Resolving deltas: 100% (9568/9568), done.
$ cd matchbox/scripts/tls
The bad part now is that we do somehow need DNS entries, but we can be a bit lazy for now and use /etc/hosts since we are using --net=host already anyway.
So let's go ahead and add our server's IP. The resulting /etc/hosts is this:
127.0.0.1       localhost
::1             localhost ip6-localhost ip6-loopback
ff02::1         ip6-allnodes
ff02::2         ip6-allrouters

127.0.1.1               raspberrypi

10.13.0.223     supermicro-ipmi.rrackow.lab
Now let's go ahead and create the certs
$ export SAN=DNS.1:matchbox.rackow.lab
$ ./cert-gen
Creating example CA, server cert/key, and client cert/key...
Using configuration from openssl.conf
Check that the request matches the signature
Signature ok
Certificate Details:
        Serial Number: 4096 (0x1000)
        Validity
            Not Before: Oct 23 11:55:06 2024 GMT
            Not After : Oct 23 11:55:06 2025 GMT
        Subject:
            commonName                = fake-server
        X509v3 extensions:
            X509v3 Basic Constraints:
                CA:FALSE
            Netscape Cert Type:
                SSL Server
            Netscape Comment:
                OpenSSL Generated Server Certificate
            X509v3 Subject Key Identifier:
                78:B3:AA:9D:F5:E0:2B:7D:84:88:BF:49:3D:41:2B:EA:47:10:BB:15
            X509v3 Authority Key Identifier:
                keyid:79:56:30:9E:78:7D:91:67:FA:97:B7:EA:57:37:1B:89:F6:2C:8C:4E
                DirName:/CN=fake-ca
                serial:07:12:B1:7F:58:0C:67:4A:D4:CE:67:BD:25:90:BE:1F:8D:4A:FC:E2
            X509v3 Key Usage: critical
                Digital Signature, Key Encipherment
            X509v3 Extended Key Usage:
                TLS Web Server Authentication
            X509v3 Subject Alternative Name:
                DNS:supermicro-ipmi.rrackow.lab:10.13.0.223
Certificate is to be certified until Oct 23 11:55:06 2025 GMT (365 days)

Write out database with 1 new entries
Database updated
Using configuration from openssl.conf
Check that the request matches the signature
Signature ok
Certificate Details:
        Serial Number: 4097 (0x1001)
        Validity
            Not Before: Oct 23 11:55:07 2024 GMT
            Not After : Oct 23 11:55:07 2025 GMT
        Subject:
            commonName                = fake-client
        X509v3 extensions:
            X509v3 Basic Constraints:
                CA:FALSE
            Netscape Cert Type:
                SSL Client
            Netscape Comment:
                OpenSSL Generated Client Certificate
            X509v3 Subject Key Identifier:
                03:5F:E8:60:1C:CF:87:18:37:15:E5:DE:7A:A3:35:48:32:C6:61:43
            X509v3 Authority Key Identifier:
                79:56:30:9E:78:7D:91:67:FA:97:B7:EA:57:37:1B:89:F6:2C:8C:4E
            X509v3 Key Usage: critical
                Digital Signature, Non Repudiation, Key Encipherment
            X509v3 Extended Key Usage:
                TLS Web Client Authentication
Certificate is to be certified until Oct 23 11:55:07 2025 GMT (365 days)

Write out database with 1 new entries
Database updated
*******************************************************************
WARNING: Generated credentials are self-signed. Prefer your
organization's PKI for production deployments.
Wonderful so now we have certs that we can use. We just need to put them some place that we actually also mount into the container:
$ sudo mkdir -p /etc/matchbox
$ sudo cp ca.crt server.crt server.key /etc/matchbox
$ sudo chown -R matchbox:matchbox /etc/matchbox
Now, we can try to run our container again:
 $ sudo docker run --net=host --rm -v /var/lib/matchbox:/var/lib/matchbox:Z -v /etc/matchbox:/etc/matchbox:Z,ro quay.io/poseidon/matchbox:v0.11.0-87-g4622144b-arm64 -address=0.0.0.0:8080 -rpc-address=0.0.0.0:8081 -log-level=debug
Unable to find image 'quay.io/poseidon/matchbox:v0.11.0-87-g4622144b-arm64' locally
v0.11.0-87-g4622144b-arm64: Pulling from poseidon/matchbox
aed6481c86ad: Pull complete
f2a13e5e4e6d: Pull complete
Digest: sha256:a82eabed36f2e176eab0c21ecc14d9389e73084ab9a7c09d108620200b9b5f52
Status: Downloaded newer image for quay.io/poseidon/matchbox:v0.11.0-87-g4622144b-arm64
time="2024-10-23T12:14:35Z" level=info msg="Starting matchbox gRPC server on 0.0.0.0:8081"
time="2024-10-23T12:14:35Z" level=info msg="Using TLS server certificate: /etc/matchbox/server.crt"
time="2024-10-23T12:14:35Z" level=info msg="Using TLS server key: /etc/matchbox/server.key"
time="2024-10-23T12:14:35Z" level=info msg="Using CA certificate: /etc/matchbox/ca.crt to authenticate client certificates"
time="2024-10-23T12:14:35Z" level=info msg="Starting matchbox HTTP server on 0.0.0.0:8080"
Please look closely at the command: you must use sudo here unless you're doing all of this as root. Otherwise, you will not be able to mount the /etc/matchbox folder and its files into the container, as you don't have the required permissions.
DHCP, TFTP & DNS
We kinda have dhcp out of the box with our UDM Pro, however just handing our IPs doesn't really cut it, so we'll run our own DHCP server as well, as we need some more. Poseidon project provides this as well for us in a dnsmasq container:
 $ docker run --rm --cap-add=NET_ADMIN --net=host quay.io/poseidon/dnsmasq \
> -q \
> --dhcp-range=10.12.0.6,10.12.0.254 \
>   --enable-tftp --tftp-root=/var/lib/tftpboot \
  --dhcp-match=set:bios,option:client-arch,0 \
  --dhcp-boot=tag:bios,undionly.kpxe \
  --dhcp-match=set:efi32,option:client-arch,6 \
  --dhcp-boot=tag:efi32,ipxe.efi \
  --dhcp-match=set:efibc,option:client-arch,7 \
  --dhcp-boot=tag:efibc,ipxe.efi \
  --dhcp-match=set:efi64,option:client-arch,9 \
  --dhcp-boot=tag:efi64,ipxe.efi \
  --dhcp-userclass=set:ipxe,iPXE \
> --dhcp-boot=tag:ipxe,http://matchbox.rrackow.lab:8080/boot.ipxe \
  --address=/matchbox.rackow.lab/10.12.0.231 \
> --log-queries \
  --log-dhcp
Unable to find image 'quay.io/poseidon/dnsmasq:latest' locally
latest: Pulling from poseidon/dnsmasq
docker: [DEPRECATION NOTICE] Docker Image Format v1 and Docker Image manifest version 2, schema 1 support is disabled by default and will be removed in an upcoming release. Suggest the author of quay.io/poseidon/dnsmasq:latest to upgrade the image to the OCI Format or Docker Image manifest v2, schema 2. More information at https://docs.docker.com/go/deprecated-image-specs/.
Story of open source: you want it working, fix it yourself. Apparently. In this case, it's probably just a tagging issue because the actualy latest build just isn't pushed to the latest tag, so we have to use the actual tag: quay.io/poseidon/dnsmasq:v0.5.0-37-gf41df2c-arm64.
$ sudo docker run -ti --rm --cap-add=NET_ADMIN --net=host quay.io/poseidon/dnsmasq:v0.5.0-37-gf41df2c-arm64 --dhcp-range=10.12.0.6,10.12.0.254 --enable-tftp --tftp-root=/var/lib/tftpboot --dhcp-match=set:bios,option:client-arch,0 --dhcp-boot=tag:bios,undionly.kpxe --dhcp-match=set:efi32,option:client-arch,6 --dhcp-boot=tag:efi32,ipxe.efi --dhcp-match=set:efibc,option:client-arch,7 --dhcp-boot=tag:efibc,ipxe.efi --dhcp-match=set:efi64,option:client-arch,9 --dhcp-boot=tag:efi64,ipxe.efi --dhcp-userclass=set:ipxe,iPXE --dhcp-boot=tag:ipxe,http://matchbox.rrackow.lab:8080/boot.ipxe --address=/matchbox.rackow.lab/10.12.0.231 --log-queries --log-dhcp
This one runs, but seems to just silently crash.
No big deal, we just run a local dnsmasq on the RPI:
$ apt-get install -y dnsmasq
Now we configure it to just do the tftp server and some options but none of the actual ip assigning. We do that in the /etc/dnsmsaq.conf and it looks like so:
dhcp-range=10.12.0.1,proxy,255.255.255.0

enable-tftp
tftp-root=/var/lib/tftpboot

# if request comes from older PXE ROM, chainload to iPXE (via TFTP)
pxe-service=tag:#ipxe,x86PC,"PXE chainload to iPXE",undionly.kpxe
# if request comes from iPXE user class, set tag "ipxe"
dhcp-userclass=set:ipxe,iPXE
# point ipxe tagged requests to the matchbox iPXE boot script (via HTTP)
pxe-service=tag:ipxe,x86PC,"iPXE",http://matchbox.rackow.lab:8080/boot.ipxe

# verbose
log-queries
log-dhcp
We also need the actual files in /var/lib/tftpboot:
# mkdir /var/lib/tftpboot
# cd /var/lib/tftpboot
# wget http://boot.ipxe.org/ipxe.efi
--2024-10-23 19:08:08--  http://boot.ipxe.org/ipxe.efi
Resolving boot.ipxe.org (boot.ipxe.org)... 54.246.183.96, 2a05:d018:a4d:6403:2dda:8093:274f:d185
Connecting to boot.ipxe.org (boot.ipxe.org)|54.246.183.96|:80... connected.
HTTP request sent, awaiting response... 200 OK
Length: 1044480 (1020K) [application/efi]
Saving to: ‘ipxe.efi’

ipxe.efi                                                                                                   100%[========================================================================================================================================================================================================================================================================================>]   1020K  1.32MB/s    in 0.8s

2024-10-23 19:08:09 (1.32 MB/s) - ‘ipxe.efi’ saved [1044480/1044480]
# wget http://boot.ipxe.org/undionly.kpxe
--2024-10-23 19:08:16--  http://boot.ipxe.org/undionly.kpxe
Resolving boot.ipxe.org (boot.ipxe.org)... 54.246.183.96, 2a05:d018:a4d:6403:2dda:8093:274f:d185
Connecting to boot.ipxe.org (boot.ipxe.org)|54.246.183.96|:80... connected.
HTTP request sent, awaiting response... 200 OK
Length: 70044 (68K)
Saving to: ‘undionly.kpxe’

undionly.kpxe                                                                                              100%[========================================================================================================================================================================================================================================================================================>]  68.40K  --.-KB/s    in 0.08s

2024-10-23 19:08:17 (813 KB/s) - ‘undionly.kpxe’ saved [70044/70044]
Now we need to restart dnsmasq:
sudo systemctl restart dnsmasq
We're ready. If we boot up our server now, you'll see that it boots, gets an IP and auto-selects PXE chainload to iPXE, which is exactly what we're looking for. However, we're still getting an error after that. The reason is, that there is no profile for this server yet, but we'll add one now.
Provisioning Machines
We're going to go with terraform for doing this, just because that might be a good middle way between automating things but also not having to write a big chunk of software ourselves.
We need to first set everything we need for the provider, namely the version and matchbox needs info about where to find the running matchbox instance and the certs to access it. The providers.tf looks like so:
provider "matchbox" {
  endpoint    = "matchbox.rackow.lab:8081"
  client_cert = file("~/.config/matchbox/client.crt")
  client_key  = file("~/.config/matchbox/client.key")
  ca          = file("~/.config/matchbox/ca.crt")
}

provider "ct" {}

terraform {
  required_providers {
    ct = {
      source  = "poseidon/ct"
      version = "0.13.0"
    }
    matchbox = {
      source = "poseidon/matchbox"
      version = "0.5.4"
    }
  }
}
Note, that if you're not doing this on the pi, you're running matchbox on, you'll need to copy the crt and key files over from there to wherever you plan to run terraform. In production, you'll want to treat this as a secret and store it like one.
Next we can specify our node in the vars:
module "lab-cluster" {
  source = "git::https://github.com/poseidon/typhoon//bare-metal/flatcar-linux/kubernetes?ref=v1.31.1"

  # bare-metal
  cluster_name            = "lab-cluster"
  matchbox_http_endpoint  = "http://matchbox.rackow.lab"
  os_channel              = "flatcar-stable"
  os_version              = "3975.2.2"

  # configuration
  k8s_domain_name    = "k8s.rackow.lab"
  ssh_authorized_key = "ssh-rsa AAAAB3NzaC1yc2EAAAADAQABAAABAQDJy7Nr1WFvmGk/onzyLdfoaxu5y0E/UzMT5yru01sU6hZQV1TnuzDJT0c2lxb2zsKgYY07MAgEpt5Civ9FpBiTxUh0qYugdR6qgMO9wpc+n5CArDAakZGRdUOXycGPtb7rJk+Lx4Z9f2csb/INJpWkXJ9Nxuof9eXw8cRBroIGXlrbLipFAN+v36PU39o2gq7JoIcFwhOolm5aOBAb/So0Z7Aa010lNr/VuiYon/kxoYa0ogHhxocBAyjrtcMbdfQi5mZquHe4y7rgxhyLGA/azRbWjBdSBpcRNeghJtB6Rofi3tTPLbjKkaBsubtzNGyD4OwUhxrw2DzkGLMqBycR"

  # machines
  controllers = [{
    name   = "node1"
    mac    = "0C:C4:7A:6E:B6:FD"
    domain = "node1.rackow.lab"
  }]
  /*
  # We only have one node now, so just comment this out
  workers = [
    {
      name   = "node2",
      mac    = "52:54:00:b2:2f:86"
      domain = "node2.example.com"
    },
    {
      name   = "node3",
      mac    = "52:54:00:c3:61:77"
      domain = "node3.example.com"
    }
  ]
  */

  # set to http only if you cannot chainload to iPXE firmware with https support
  download_protocol = "http"
}
What's happening here is that we're setting the name of the cluster, where to reach matchbox, which version of flatcar and in which channel. Additionally, we're setting the MAC of our first node, this is the MAC of our server, we're trying to boot into being a node.
Now we have to initialize terraform like so:
$ terraform init

Initializing the backend...
Initializing modules...
Downloading git::https://github.com/poseidon/typhoon?ref=v1.31.1 for lab-cluster...
- lab-cluster in .terraform/modules/lab-cluster/bare-metal/flatcar-linux/kubernetes
Downloading git::https://github.com/poseidon/terraform-render-bootstrap.git?ref=1cfc6544945e7c178d6a69be2439a01e060d3528 for lab-cluster.bootstrap...
- lab-cluster.bootstrap in .terraform/modules/lab-cluster.bootstrap
- lab-cluster.workers in .terraform/modules/lab-cluster/bare-metal/flatcar-linux/kubernetes/worker

Initializing provider plugins...
- Reusing previous version of hashicorp/tls from the dependency lock file
- Reusing previous version of poseidon/matchbox from the dependency lock file
- Reusing previous version of poseidon/ct from the dependency lock file
- Reusing previous version of hashicorp/null from the dependency lock file
- Reusing previous version of hashicorp/random from the dependency lock file
- Using previously-installed hashicorp/random v3.6.3
- Using previously-installed hashicorp/tls v4.0.6
- Using previously-installed poseidon/matchbox v0.5.4
- Using previously-installed poseidon/ct v0.13.0
- Using previously-installed hashicorp/null v3.2.3
Before the next step DOUBLE CHECK YOUR CERTIFICATES! Otherwise it will fail and will be nasty to troubleshoot, as this issue I created after over an hour of back forth, shows.
Anyhow, the next step is to do terraform plan like so:
$ terraform plan
module.lab-cluster.data.ct_config.install[0]: Reading...
module.lab-cluster.data.ct_config.controllers[0]: Reading...
module.lab-cluster.data.ct_config.install[0]: Read complete after 0s [id=713418597]
module.lab-cluster.data.ct_config.controllers[0]: Read complete after 0s [id=3849528255]

Terraform used the selected providers to generate the following execution plan. Resource actions are indicated with the following symbols:
  + create

Terraform will perform the following actions:

  # module.lab-cluster.matchbox_group.controller[0] will be created
  + resource "matchbox_group" "controller" {
      + id       = (known after apply)
      + name     = "lab-cluster-node1"
      + profile  = "lab-cluster-controller-node1"
      + selector = {
          + "mac" = "0C:C4:7A:6E:B6:FD"
          + "os"  = "installed"
        }
    }

...

  # module.lab-cluster.module.bootstrap.tls_self_signed_cert.kube-ca will be created
  + resource "tls_self_signed_cert" "kube-ca" {
      + allowed_uses          = [
          + "key_encipherment",
          + "digital_signature",
          + "cert_signing",
        ]
      + cert_pem              = (known after apply)
      + early_renewal_hours   = 0
      + id                    = (known after apply)
      + is_ca_certificate     = true
      + key_algorithm         = (known after apply)
      + private_key_pem       = (sensitive value)
      + ready_for_renewal     = false
      + set_authority_key_id  = false
      + set_subject_key_id    = false
      + validity_end_time     = (known after apply)
      + validity_period_hours = 8760
      + validity_start_time   = (known after apply)

      + subject {
          + common_name  = "kubernetes-ca"
          + organization = "typhoon"
        }
    }

Plan: 39 to add, 0 to change, 0 to destroy.

───────────────────────────────────────────────────────────────────────────────────────────────────────────────────────────────────────────────────────────────────────────────────────────────────────────────────────────────────────────────────────────────────────────────────────────────────────────────────────────────────────────────────────────────────────────────────────────────────────────────────────────────────────────

Note: You didn't use the -out option to save this plan, so Terraform can't guarantee to take exactly these actions if you run "terraform apply" now.
Let's try our look then:
terraform apply
At some point it'll prompt you if you want to succeed and you type yes.
Now all that's left is boot and pray:
ipmitool -H 10.13.0.223 -U USER -P PASS chassis bootdev pxe
Set Boot Device to pxe
ipmitool -H 10.13.0.223 -U USER -P PASS
Chassis Power Control: Up/On
If everything went well, you should be able to ssh into the node now:
$ ssh  core@node1.rackow.lab
Warning: Permanently added 'node1.rackow.lab' (ED25519) to the list of known hosts.
Flatcar Container Linux by Kinvolk stable 3975.2.2
Update Strategy: No Reboots
